The pricing guide in NetSuite!
Do you have a multiple pricing strategy? Do you want to establish different pricing levels as well as customer-specific and currency-specific pricing?
Your NetSuite ERP allows you to centrally manage, control and update the pricing of all your customers. With a single system that allows you to define multiple pricing strategies, you will be able to increase your sales and retain your customers.
In this article, we explain how to define your pricing in NetSuite in 4 steps:
- Creating differentiated price levels
- Creation of price groups
- Associating items to price groups
- Selecting the customers to whom these prices apply
Follow the guide!
1) Creation of Differentiated Price Levels
To show you how to set up your pricing in NetSuite, let’s take the example of products in the “Tools” category. Preferential rates have been negotiated for this product family and you therefore find yourself with different prices to apply according to your customers.
The first step is to create the preferential rate that you want to set up for the products in your tools category. For the example, we will start with a 15% discount.
a. To do this, first make sure that the “Multiple Prices” feature is enabled: Setup > Company > Enable Features > Transactions > Multiple Prices.
b. Then you can create your price levels: Configuration > Accounting > Accounting list > New > Price level.
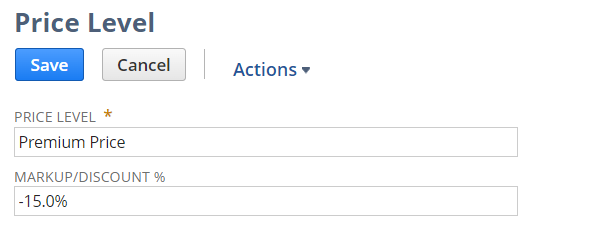

Here, on a given item, I have created a Premium Customer price level, which is 15% lower than my reference price.
Note:
It is also possible that the price level is not a fixed percentage of markup or discount but is independent of the reference prices. In this case, you will have to leave this field empty and fill in the price associated with the price level manually or by CSV import on the item files.
2) Creation of Price Groups
You have just created your preferred price in NetSuite. You now need to create the product family that will group all the products in your tools category that share the same pricing policy. That is, all the products that will benefit from the 15% discount. This functionality is called: price groups.
To do this, you must first create the pricing group: Configuration > Accounting > Accounting list > New > Price group.
In the example below, we have 2 price groups:
- Tooling
- Garden furniture
3) Association of items to a price group
The second to last step consists of attaching all your products in the tooling category to your price group. In other words, indicate in your ERP which items will benefit from the pricing in NetSuite (of -15%), for a selection of customers.
Go to your item file and define, in the Sales / Pricing tab, to which Price Group the item is attached. Here I associate my item Drill with my price group Tools.
4) Apply a negotiated price to a customer
Now that your item families and price levels have been created, all you have to do is select the customers who will benefit from the 15% discount.
1) Go to your customer file, finance tab, group rate and associate the price level or price group.
So here, for this particular customer, we have the products in the Tools price group that will receive the 15% off Premium customer rate and the items in the Garden Furniture price group that will be at the reference price.
And that’s it, you’ve just created your pricing in NetSuite! Simple, isn’t it? Note that steps 3 and 4 can be done manually or by CSV import.